
In this article I’m going to guide you through the process I use to build a simple HTML web page from scratch.
Websites and how they work behind the scenes may seem like a black box. We use them practically every day to learn new things, research products, and connect with others around the world, but how they do what they do still remains a mystery. By the end of this article you should have a better understanding of how a website is built, and what goes on behind the scenes to make one a reality.
First, let’s take a look at the three steps we’ll follow to achieve our goal. Then we’ll begin building out our basic web page. Let’s dive in!
Here’s an overview of the steps we’ll be following:
- Create a Basic HTML document
- Fill in our sections with content
- Add classes for CSS
In my article “How to Design a Website” we created the mock-up for the website we’ll be building in this article, so hopefully you’ve already read that article coming into this one; if not I would recommend doing so.
Using the mock-up created, we will begin translating it into the core building blocks of the web. What are they? CSS, HTML and Javascript. To build any basic website, a knowledge of these core languages is important. At the very least you should have a good grasp of HTML and CSS. Javascript adds more functionality to your website, it makes websites more interactive and user-friendly, but it’s not required for the simple web page we’ll be building today.
Let’s quickly cover each one, and how they fit into our website architecture.
HTML
HTML, which stands for Hypertext Markup Language, is the backbone of the page, and creates the “structure” of every website on the web. It allows you to “markup” your content with tags that let the browser know what type of content it is, and how to display it. Well sort of, really it’s the job of CSS to inform the browser how to display your content, but we’ll get to that in a moment.
Javascript
We won’t be covering Javascript here but a basic understanding will be helpful. Javascript is the programming language of the web. What exactly is it used for? As the web evolves, Javascript continues playing a bigger role in websites, allowing us to add more advanced interactions, data filtering, and a ton of other useful features; but most commonly Javascript is used to create dynamic user interactions – like triggering a pop-up modal when a user clicks a button, or changing a slide in a carousel. It allows us to create rich interactions that capture users’ attention and draw them back because of the good experience they had.
CSS
CSS, which stands for Cascading Style Sheets, is used to make websites look good. By “hooking” into the content via HTML, CSS tells the browser how it should be displayed to the end user. When done right, it can be used to create beautiful websites.
Setting up our project
Now that we’ve covered the basics let’s start working on our website! Let’s start off our project by creating the website’s main folder; which I’ll call “My Website” for simplicity. This folder will contain everything that will make up our web page: images, CSS, Javascript libraries, etc. Let’s create two subfolders, one named “CSS” and the other “images”. Now we’ll create an HTML document by opening a blank text editor (such as textEdit, Sublime, etc.) and saving it as “home” into our main folder with the extension .html.
Ok, we now have the basic documents we need to begin writing code. Most web developers have their own prefered workflows or ways of doing things, but for our purposes here we’ll be using the simple strategy I myself use to convert design into code. I start by looking for the main sections of the mock-up: The main navigation/header, the hero section (which usually sits at the top of the page), the main content, and the footer. Once I’ve identified them, I’ll outline the HTML page with the appropriate tags for layout and semantics.
So let’s go ahead and create a simple HTML document. (I’m going to be referencing the mock-up design I created in my previous article “How to Design a Website”, but you don’t need to have it as I’ll be showing examples of it as we go along.)
First, let’s tell the browser what HTML version our web page will be using. We do this with a DOCTYPE tag. I’ll be using the typical HTML5 syntax so the declaration will be really simple. Now that the browser has a heads up of what to expect we’ll declare the start and end of the HTML document with some HTML tags. All of our website HTML will go between these tags.
Every web page contains a section called the head; this is where the meta data – the supporting information for the document will go. Things like the title, keywords, description, and links to our external resource files will go here there. (I’ll talk more about that in part two, when we start using CSS to style the web page.) Next we’ll create two body tags which will contain the main content, and everything that will need to be visible to the public. Most of our work will be done between them.
Creating Our Basic Structure
<html>
<head>
<title>Page Title</title>
</head>
<body>
<h1>This is a Heading</h1>
<p>This is a paragraph.</p>
</body>
</html>
Now we’ll outline the main content. Let’s first write two header tags that will contain our hero and any desired navigational elements. Next, let’s add some main tags where the main content will go. Between them let’s add a few section tags for the reviews, benefits, stats, and CTA. Finally we’ll add the footer tags for all the secondary content (copyright, social icons etc.)
Define Our Main Sections
<html>
<head>
<title>Page Title</title>
</head>
<body>
<header>
<section id="hero">
</section>
</header>
<main>
<section id="quotes">
</section>
<section id="benefits-wrapper">
</section>
<section id="stats-wrapper">
</section>
<section id="pricing">
</section>
<section id="summary">
</section>
</main>
</body>
</html>
Great! Now that we’ve created the main content outline let’s go a step further and fill each section with the appropriate tags. We’ll start with the header section, where the hero-shot and CTA will go.
In our mock-up below we can break the content into two sections, one for the left content, and one for the right. Let’s add two div tags to represent that. For CSS styling purposes we’ll also wrap these tags in a container div (I’ll be doing this a lot in the rest of the web page, so when you see what appear to be extra div tags you’ll know why).
In the left block there’s a descriptive title with some buttons below it. The title has two different font sizes so we’ll need to differentiate them. Let’s add a h1 tag with a span inside that will later let us increase the font size with CSS. Let’s follow them with two a tags that will represent our buttons. The left div is done, let’s fill out the right div now.
The right div will be a lot simpler; in fact, all we need to do is add an img tag for our product shot, I’ll also wrap that in another div for CSS styling later. Moving right along, we’ll work on the review section next!
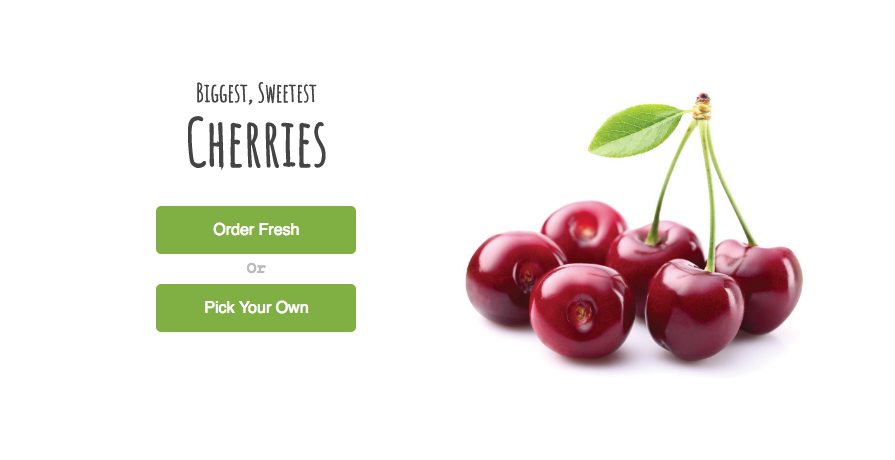
Creating the hero section
<section>
<div>
<div>
<h1> <span> Biggest, Sweetest </span> <br> Cherries </h1>
<a> Order Fresh </a>
<span> Or </span>
<a> Pick your Own </a>
</div>
<div>
<div>
<img>
</div>
</div>
</div>
</section>
</header>
The review section will contain a couple divs with a blockquote tag inside. The blockquote tag seems to be the best choice for our situation. Inside of it let’s put a h2 to represent the reviewer, a span to contain the review, and an img tag to represent the rating.
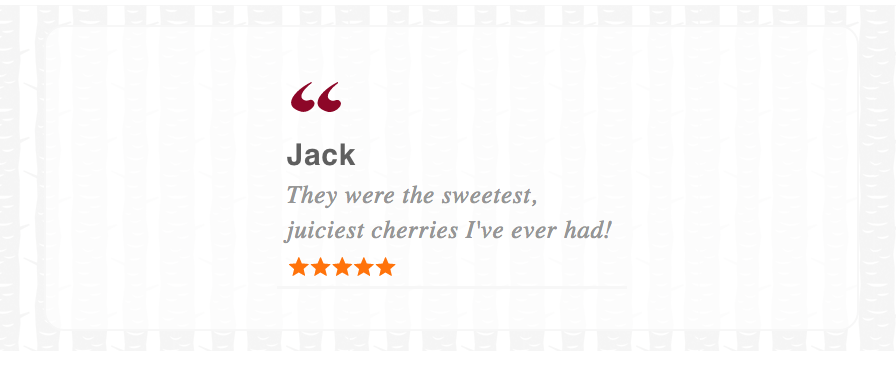
Creating the review section
<div>
<div>
<div>
<blockquote>
<h2>Jack</h2>
<span> They were the sweetest, juiciest cherries I've ever had! </span>
<img>
</blockquote>
</div>
</div>
</div>
</section>
Ok, so you’re probably starting to get the idea, but this one will be a little more tricky. In the benefits section we’ll create a row of 3 divs that will each act as a containing row for two child items inside. Each of the child items will be display in a row. The items on the left side will contain an a tag for the benefit, and an img tag for the icon. And the items on the right will contain a list which we’ll create using the ul tag to define the list, and an li tag to represent each list item.
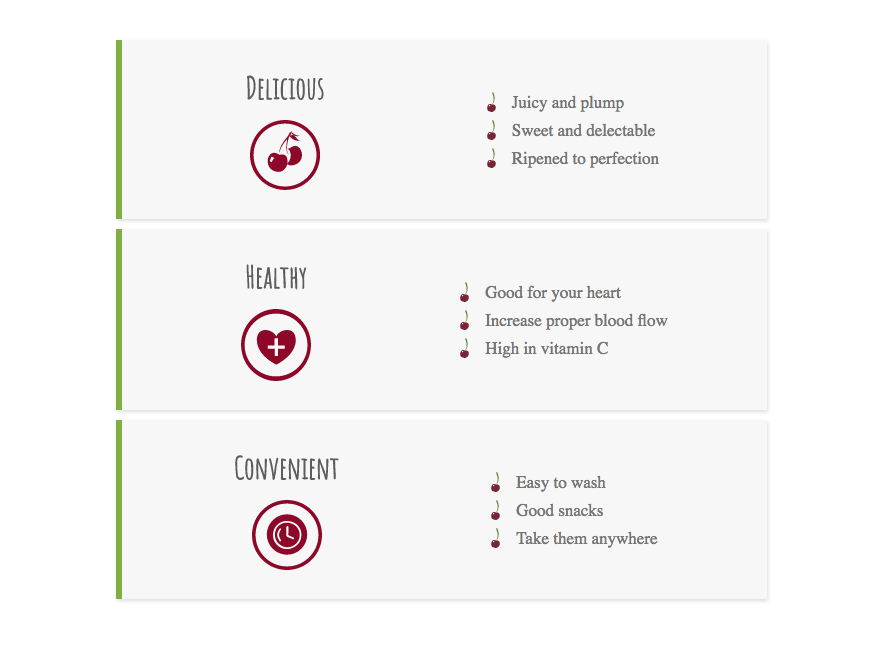
Creating the benefits section
<div>
<div>
<div>
<div>
<div>
<a> Delicious </a>
<img>
</div>
</div>
<div>
<div>
<ul>
<li> Juicy and plump </li>
<li> Sweet and delectable </li>
<li> Ripened to perfection </li>
</ul>
</div>
</div>
</div>
<div>
<div>
<div>
<a> Healthy </a>
<img>
</div>
</div>
<div>
<div>
<ul>
<li> Good for your heart </li>
<li> Increase proper blood flow </li>
<li> High in vitamin C </li>
</ul>
</div>
</div>
</div>
<div>
<div>
<div>
<a> Convenient </a>
<img>
</div>
</div>
<div>
<div>
<ul>
<li> Easy to wash </li>
<li> Good snacks </li>
<li> Take them anywhere </li>
</ul>
</div>
</div>
</div>
</div>
</div>
</section>
Let’s go ahead and create the stats section. For each stat we’ll add a div which will contain a span tag for the stat number, and a p tag for the description text below it.
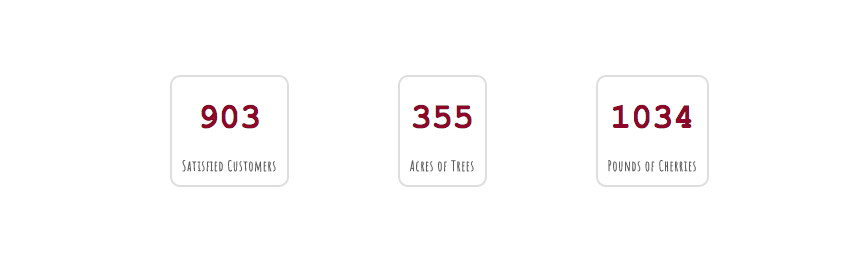
Creating the stats section
<div>
<div>
<div>
<div>
<span> 903 </span>
<p> Satisfied Customers </p>
</div>
</div>
<div>
<div>
<span> 355 </span>
<p> Acres of Trees </p>
</div>
</div>
<div>
<div>
<span> 1034 </span>
<p> Pounds of Cherries </p>
</div>
</div>
</div>
</div>
</section>
We’re almost done! Let’s build the pricing section. We’ll add a div with three sub divs; each will contain a wrapper div. Inside each one let’s write a p tag for the title followed by an img tag for the package photo, below that we’ll add another p tag for the price, a div for the description, and finally an a tag which will be used for the buy button.
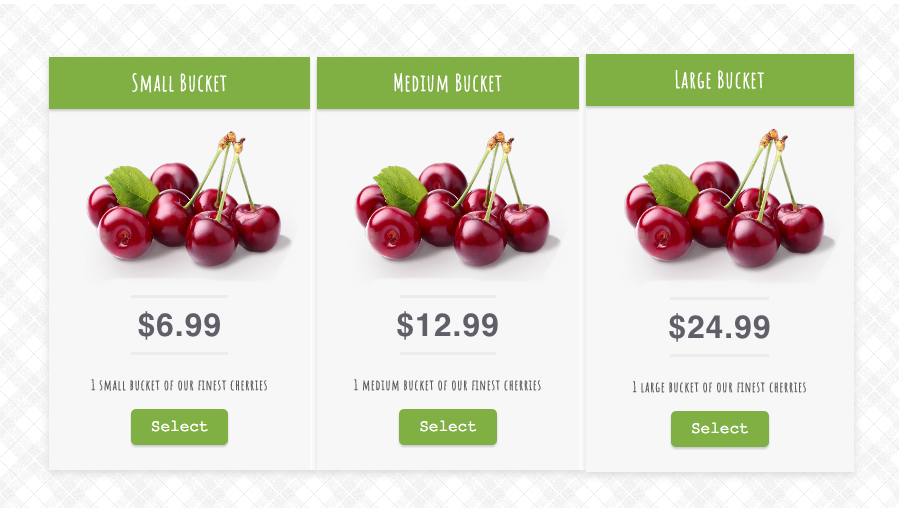
Creating the pricing section
<div>
<div>
<div>
<div>
<p> Small Bucket </p>
</div>
<img>
<hr>
<p> $6.99 </p>
<hr>
<div>
<p> 1 small bucket of our finest cherries </p>
</div>
<a> Select </a>
</div>
<div>
<div>
<p> Medium Bucket </p>
</div>
<img>
<hr>
<p> $12.99 </p>
<hr>
<div>
<p> 1 medium bucket of our finest cherries </p>
</div>
<a> Select </a>
</div>
<div>
<div>
<p> Large Bucket </p>
</div>
<img>
<hr>
<p> $24.99 </p>
<hr>
<div>
<p> 1 large bucket of our finest cherries </p>
</div>
<a> Select </a>
</div>
</div>
</div>
</section>
Finally, let’s fill in our last section with the CTA!
Our CTA will have a div with two sub divs, each will float next to each other. The left div will have an img tag for the product image, and a ul list for the bullets. The right div will contain a h2 tag and a p tag. Below these we”ll place the div that will contain our final CTA button represented with the a tag!
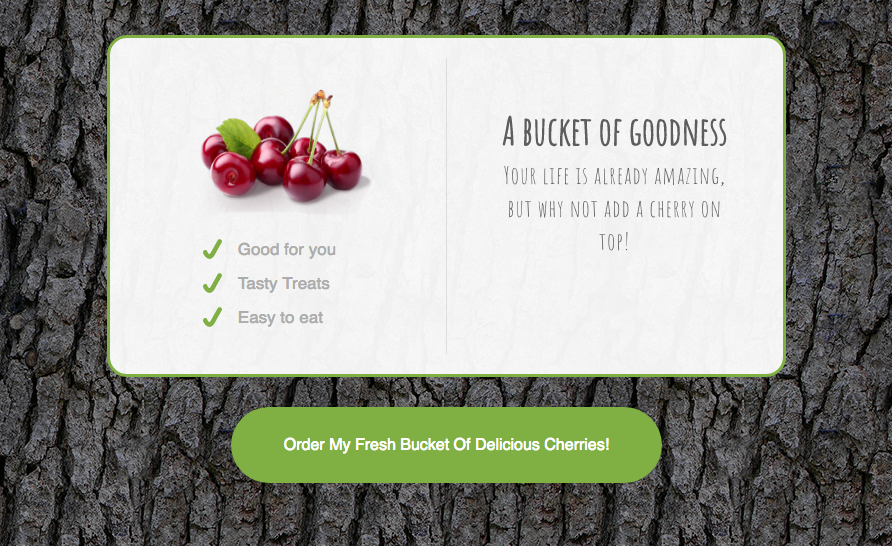
Creating the cta section
<div>
<div>
<img>
<ul>
<li> Good for you </li>
<li> Tasty Treats </li>
<li> Easy to eat </li>
</ul>
</div>
<div>
<h2>A bucket of goodness</h2>
<p> Your life is already amazing, but why not add a cherry on top! </p>
</div>
</div>
<div>
<a> Order My Fresh Bucket Of Delicious Cherries! </a>
</div>
</section>
Let’s put it all together.
Putting everything together
<html>
<head>
<title>Page Title</title>
</head>
<body>
<header>
<section id="hero">
<div>
<div>
<h1> <span> Biggest, Sweetest </span> <br> Cherries </h1>
<a> Order Fresh </a>
<span> Or </span>
<a> Pick your Own </a>
</div>
<div>
<div>
<img>
</div>
</div>
</div>
</section>
</header>
<main>
<section id="quotes">
<div>
<div>
<div>
<blockquote>
<h2>Jack</h2>
<span> They were the sweetest, juiciest cherries I've ever had! </span>
<img>
</blockquote>
</div>
</div>
</div>
</section>
<section id="benefits-wrapper">
<div>
<div>
<div>
<div>
<div>
<a> Delicious </a>
<img>
</div>
</div>
<div>
<div>
<ul>
<li> Juicy and plump </li>
<li> Sweet and delectable </li>
<li> Ripened to perfection </li>
</ul>
</div>
</div>
</div>
<div>
<div>
<div>
<a> Healthy </a>
<img>
</div>
</div>
<div>
<div>
<ul>
<li> Good for your heart </li>
<li> Increase proper blood flow </li>
<li> High in vitamin C </li>
</ul>
</div>
</div>
</div>
<div>
<div>
<div>
<a> Convenient </a>
<img>
</div>
</div>
<div>
<div>
<ul>
<li> Easy to wash </li>
<li> Good snacks </li>
<li> Take them anywhere </li>
</ul>
</div>
</div>
</div>
</div>
</div>
</section>
<section id="stats-wrapper">
<div>
<div>
<div>
<div>
<span> 903 </span>
<p> Satisfied Customers </p>
</div>
</div>
<div>
<div>
<span> 355 </span>
<p> Acres of Trees </p>
</div>
</div>
<div>
<div>
<span> 1034 </span>
<p> Pounds of Cherries </p>
</div>
</div>
</div>
</div>
</section>
<section id="pricing">
<div>
<div>
<div>
<div>
<p> Small Bucket </p>
</div>
<img>
<hr>
<p> $6.99 </p>
<hr>
<div>
<p> 1 small bucket of our finest cherries </p>
</div>
<a> Select </a>
</div>
<div>
<div>
<p> Medium Bucket </p>
</div>
<img>
<hr>
<p> $12.99 </p>
<hr>
<div>
<p> 1 medium bucket of our finest cherries </p>
</div>
<a> Select </a>
</div>
<div>
<div>
<p> Large Bucket </p>
</div>
<img>
<hr>
<p> $24.99 </p>
<hr>
<div>
<p> 1 large bucket of our finest cherries </p>
</div>
<a> Select </a>
</div>
</div>
</div>
</section>
<section id="summary">
<div>
<div>
<img>
<ul>
<li> Good for you </li>
<li> Tasty Treats </li>
<li> Easy to eat </li>
</ul>
</div>
<div>
<h2>A bucket of goodness</h2>
<p> Your life is already amazing, but why not add a cherry on top! </p>
</div>
</div>
<div>
<a> Order My Fresh Bucket Of Delicious Cherries! </a>
</div>
</section>
</main>
</body>
</html>
The next step
If you’ve stuck with me until now, great job! We’ve now created the HTML for our website; this lays the groundwork for part two where I’ll show you how we can style our HTML with CSS!